Category Archives: Equipment

Understanding wildlife shooting distances with super-telephoto lenses

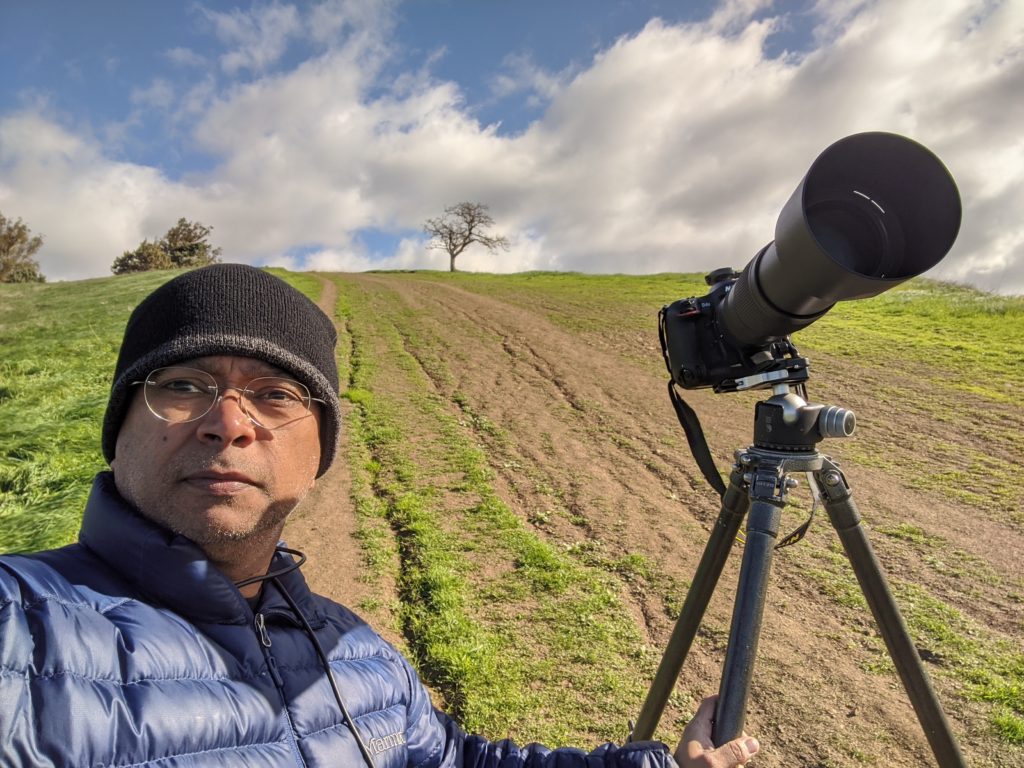
People not familiar with wildlife photography, assume naively that just because I have a super-telephoto lens as shown below, I can zoom in and shoot a mole on a rat’s behind, a mile away.

This is not true.

This is me, with my Nikon D4S and Nikkor 200-500mm f5.6 lens.
Caption: This is me, with my Nikon D4S and Nikkor 200-500 f5.6 lens.

So, how much can you zoom? 

In other words, how far can a bird be, to be able to shoot it with sufficient quality, so that one can look at the resulting image and be able to see details (eyes, feather details etc)?  

I am going to get a bit technical with high school physics.

The ratio of the “image size” to the “object size” is the same as the ratio of the “lens focal length” and the “object distance” from the lens.

Let’s define the terms contained here.

Image Size – The size of the image on the sensor.  In 35mm photography, the size of the sensor is 24mm x 36mm.  In a horizontal image, if a bird’s image should occupy half the height of the sensor, the image size is 12mm.  If the length of the bird along the length of the sensor should occupy half the sensor’s length, that should be 18mm.

Object Size – This is the height or length of the bird in real life.  For a sparrow, the length is around 150mm and the wingspan is around 200mm.

Lens Focal Length – When you buy a lens, it is mainly differentiated by its focal length, although the other differentiating characteristic is its maximum aperture.  Discussing max aperture is beyond the scope of this post.  So, for my Nikkor 200-500mm lens, the focal length is variable between 200mm and 500mm.

Object Distance – This is the distance between the bird and the lens.  This is the answer we are seeking – “how far can you zoom?”.

Having established this much, it is now easy to make the necessary calculations.  To illustrate, let us take a few examples.

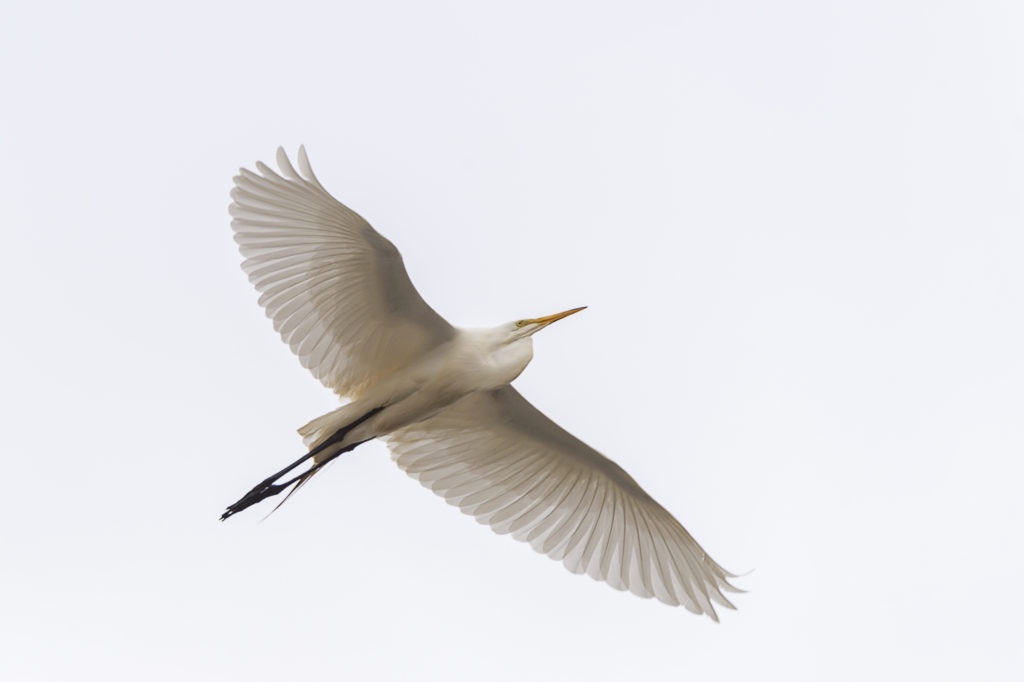
Example 1:  With my 400mm lens, how close was I to this snowy egret, when I made this image?

Caption: Snowy Egret in flight, Don Edwards Wildlife Refuge, Alviso, CA

Let us estimate that the wingspan of this bird image is about half the horizontal length of the sensor and therefore “Image Size” = 18mm.  Snowy Egret wingspan is roughly 40 inches or 1000mm.  Therefore “Object Size” = 1000mm.  I used a focal length of 400mm.  

Therefore, we can now easily calculate the bird distance as follows:

Distance of bird = Focal length x Object Size / Image Size

Distance of bird = 400mm x 1000mm / 18mm

Distance of bird = 22,222 mm = 22 meters.

Example 2: How far can a sparrow be to fill the frame the same way as example 1? 

Let’s use the same 400mm.  The sparrow wingspan is 200mm.  Therefore:

Distance of sparrow = 400mm x 200mm / 18mm

Distance of sparrow = 4,444 mm = 4.4 meters.

Example 3: In the following image, how close was I when I photographed these american white pelicans?

Caption: American White Pelicans in flight, Don Edwards San Francisco Bay Wildlife Refuge, Alviso, CA, USA

Estimate the bird image size to be 10% of the sensor length or 3.6mm.  Assume the same 400mm lens.  These pelicans are roughly 60 inches or 1500mm in length. The calculation is straightforward:

Distance of these birds = 400mm x 1500mm / 3.6mm

Distance of these birds = 166,667mm = 167 meters.

Example 4: What if you used a 600mm lens, instead of 400mm? 

You can now have 50% additional distance between you and the flying bird.

Example 5: What if you used a 200mm lens, instead of 400mm? 

Your distance to the bird needs to be halved.

Example 6: What lens would you need, to fill half the frame sensor with a sparrow that is 100 meters or 100,000mm away? 

The calculation would be:

Focal length needed = 100,000mm x 18mm/200mm = 9000mm. 

The longest lens that is commercially available today is the 800mm lens.  That lens costs about $ 12,000 or more.  There is no 9000mm lens.  Your best bet is to master techniques to get closer to the sparrow.

Example 7: What if I used a 1.5x crop sensor (an APS-C sensor), which is roughly 16mm x 24mm?

You will get additional 50% distance from the bird.

Correcting White Balance in Digital Images using expodisc 2.0

Of all the autoexposure features available in modern DSLRs, the one that is most frustrating for me is the Auto-WB.  For years, I set the white balance to Auto-WB, hoping to be fine with the color in my digital images.  Again, for all those years, my mind wasn’t tuned to deciphering the color issues.  Recently, I noticed that some of my landscape shots looked too blue to me.  Talking to a former photography student and now a good photographer himself, Sanjiv Kapoor, I learned how to adjust the color temperature and the tint sliders in Lightroom to get the right colors.  Furthermore, I learned the idea of using a WB filter to reduce the guesswork involved in this exercise.  Here’s how.

This is my process for RAW shooting.  I attach an expodisc 2.0 WB filter to the front of the lens, in the light condition of the main shot, to make a reference image at metered exposure.  It produces a perfect (18%) neutral gray image.

Neutral Gray Image

Neutral Gray Image made with a WB filter in the same light as the image subject.  Caveat – if you are viewing this post in a monitor not correctly color calibrated, you are not seeing neutral gray.

Once opened in Lightroom, the default may not open up as neutral gray.  It will open up with a default color temperature and tint, that may not be the real color temperature/tint.  Drop the eyedropper from the Lightroom Develop Module into this image.  That neutralizes any color cast in this reference and gives you the right white balance.  Just apply the same color temperature and tint to the desired image.  It is quite easy to do this in Lightroom, by simply “sync”ing the develop settings.  In fact, I spend my time long enough on this reference (see the dust spot in it – I correct that, plus apply the lens profile etc), before “syncing” it to all the frames shot in the same light.

Here’s an example.  As opened in Lightroom, the top image shown here is how it looked.

Image as seen after Lightroom opened RAW file

How this image looked when RAW file was opened up as default in Lightroom. Too blue and not representing what was seen.

This is too blue and did not represent what was seen.  The color temperature was 5750 with a tint of -4.  The neutral gray reference shot shown earlier had a color temperature of 8800 with a tint of -5.  Upon correcting this image to that, the resulting final image is shown below.

Image with corrected white balance

Image with corrected white balance, with the aid of the expodisc 2.0

This represents what was seen.

Now that I have figured this out, and now that I have tuned my mind to seeing colors a bit better, I find all kinds of color errors all over my portfolio from years of work!!  🙂  As I find time, I will keep correcting the color of my past photographs, but I don’t have the reference shots to help me.

NOTE: The user’s manual for expodisc 2.0 talks about a different way to use it.  Take a reference shot into the camera, by using a setting for white balance reference shot.  Then the following images will be rendered correctly.  In my honest opinion, this method is appropriate for jpg shooters.  The method I outlined here is more suited for RAW shooters.

Red Streak Noise in Long Exposure Night Shots Solved

Last Saturday, I was photographing along the California Hwy 1 coastline at night.  It was pretty dark requiring long exposures.  With that came a noise problem – a red streak in the image.  See below.

Long Exposure Night Shot of Sea Stack showing red streak noise

Long Exposure Night Shot of Sea Stack along California Hwy 1 Coast. See the two red streaks in the lower one-thirds of the image.

This was an eight minute exposure.  Shot at f22, ISO100.  Nikkor 70-200mm f2.8 lens and Nikon D4S body.  Fortunately, I had another two minute exposure of the same composition, made when there was a bit more light that would work for me as a keeper.  So, I had not lost the shot.  But, it was disconcerting to realize that I was limited to two minute exposures with this lens for night shots.

First, I wanted to ascertain that the red streak noise was repeatable.  I ran a series of tests on long night exposures yesterday, only to realize that with this lens, it was very repeatable as long as the scene was pretty dark and my exposure was greater than 2 minutes @ ISO100.  I also verified other ISOs and found that the red streak noise found during 4 minutes @ ISO100 and that found during 1 minute @ ISO400 were about the same.  There was no escaping this.  If I needed to shoot in very dark conditions – I will not be able to get away with shorter exposures, using ISO to compensate.  This was depressing …

Next, I attempted to see if “long exposure noise reduction” would compensate for this issue.  After all, the long exposure noise reduction works by making a dark exposure with identical parameters, with the shutter closed.  The idea is that the noise on the sensor would be same, which is later subtracted from the main image, thus reducing or eliminating to a great extent the noise resulting from long exposure.  The results of these tests were disappointing as well.  The noise was the same in the RAW files, but slightly reduced in the in-camera JPGs.  I shoot 100% RAW and would not be happy switching to JPG for the slight reduction in the red streak noise.  I needed to solve it fully.

As I drove around and lived my life today, it occurred to me that I should perhaps try to apply the long exposure noise reduction idea manually.  At the next opportunity I got, I put the lens cap on the same lens and made an eight minute exposure at f22 and ISO100.  The resulting dark exposure with red streak noise is shown below.

Dark exposure with lens cap on, recreating the red streak noise alone.

Dark exposure with lens cap on, recreating the red streak noise alone.

Now, I had to figure out a way to subtract the red streak noise seen in this image, from the original image.  Since I have been stacking images in Photoshop for years, this was easy for me to figure out.  Here is the procedure:

1. Load both images from LR into PS as layers.

2. Right-click the layers in PS and “Convert to Smart Object”.

3. Pull-down “Layer” > “Smart Objects” > “Stack Mode” > Range.

Stacking using “Range” makes sense, because it is essentially subtracting the maximum signal from the minimum signal and providing the difference.  Since the second image (containing only the red streak noise) has black in the rest of the image, only the red streak noise will get eliminated.

I tried this procedure and “bingo”, it worked.  The red streak noise was eliminated and there was no loss to the image quality.  All details of the underlying image came alive just as I had imagined.  The resulting red streak noise free image is shown below.

Red streak noise has now been eliminated in this image, using the procedure mentioned in this post.

Red streak noise has now been eliminated in this image, using the procedure mentioned in this post.

Conclusion – While I have not solved how to prevent the red streak noise in the first place, I have a pretty good procedure to deal with it in post.  Just take another image with the same exposure parameters as the real image, with the lens cap “on” this time.  This may be done several days later and in conditions different from the shoot.  Then, subtract the latter from the former using the PS procedure just outlined.

PS.  I have observed this red streak noise in my Nikkor 70-200mm f2.8 VR lens.  Others have reported it on the Nikkor 16-35mm f4 lens.  I checked my 16-35mm f4 lens and do not see this noise in that one.

If you have seen this type of red streak noise during long night exposures, please try this procedure and let me know if it worked for you.  I would appreciate it, if you could post your success story as a comment here.  Thank you for your attention.

On Renting Super Telephoto Lenses

I get this question often and thought I should write a brief post about it.

There are some lenses that are extremely expensive for most photography enthusiasts to afford and hence they are very interested in renting these.  Especially for a big safari trip to Africa.  For example, the 500mm and 600mm prime lenses used for wildlife and sports photography.  The main misunderstanding among those considering a super telephoto lens rental is the feeling that the only gap between them and great wildlife/sports photographs, is the lens.  This is plain wrong.

Simply having a great lens is not sufficient for you to make great images with it.  What you really need is lots of practice with that lens for a prolonged time, until you are familiar with using it proficiently.  Exposure and focusing problems aside, one of the hardest skills to master in wildlife or sports photography is the ability to track a fast moving bird or object.  In the beginning stages, even with my 70-200mm f2.8 lens coupled with a 2x teleconverter, it was a real achievement for me, if I could spot a flying bird with my eyes and then immediately point my lens towards that bird and barely be able to see that bird through the viewfinder.  Even getting this far was difficult, let alone getting the bird in focus and furthermore, ensuring that the eyes of the bird were sharply focused with a glint in it.  Look, handling super telephoto lenses in the field successfully, requires loads of years of practice and renting them for a first and last Kenya trip does not make sense.  You will spend more time fumbling with your equipment than enjoying your visit.

So what to do – Buy yourself some inexpensive wildlife lenses and practice with it locally for months and months before you go.  For example, the 70-200mm f2.8 lens with a 2x teleconverter is what I use.  You can go for something similar.  I recently heard that 3rd party lens manufacturers have a very affordable 100-300 mm f4 lens that can be coupled with a 1.4x teleconverter to give you a 140-400mm range.  If you do this with a crop-factor sensor, you effectively have a 600mm reach.  Now, if you can really afford to buy a 600mm lens for the $10,000 price tag, go for it.  But, please don’t buy it one week before your once-in-a-lifetime Tanzania trip.  Buy it a year before and practice in your local park, until you get good at it, before you go.

So when to rent – Despite what I have said so far, there are situations in which renting makes sense.  Here are some examples –

  1. You already have a 600mm lens and for some reason, it broke just one week before your big Safari trip.  Go ahead and rent the same one.
  2. You don’t want to risk carrying your big lens on an airline with all the restrictive carry-on luggage limits.  Leave your lens at home and rent one at the Safari location, if available.
  3. You usually use a 17-55mm f3.5-5.6 lens and based on the dark situations involved in your next night photography trip, you feel the need for a faster lens.  Go ahead and rent the 17-35mm f2.8 lens.
  4. You already have a 600mm lens, but your manufacturer has introduced a newer version with additional features.  You want to test whether the new features are worth it for you.  Go ahead and rent the newer version lens and try it out for a couple of weeks, before you decide to upgrade yourself.

You get the idea.  Don’t rent a lens in a focal length range that you have never photographed just for that once-in-a-lifetime trip.  It simply won’t work.

If you like this post, please forward to your friends.  My facebook page is https://facebook.com/pixgaga.  If you like, please sign up for my “photography tips” emails delivered to your email box.

American Avocet in flight, Don Edwards Wildlife Refuge, Alviso, CA, USA

American Avocet in flight, Don Edwards Wildlife Refuge, Alviso, CA, USA. I made this image a few months back. And, I have been practicing photography for nine years. It took me that long to succeed in a well timed shot like this. I could not have done it with a rented super telephoto lens.

Turkey Vulture, Alviso, CA, USA

Turkey Vulture, Alviso, CA, USA. One of the most difficult things in wildlife photography with telephoto lenses, is to be able to frame a fast moving bird or animal well.  Years of practice is required.

Working a composition

When I come across something interesting to photograph, I do not click one image of an obvious composition and walk away.  I start with the obvious compositions, but I keep refining and altering my position, until I have attempted a lot of variations.  Very often, when I review my work later in Lightroom, I find that my later refinements bring out the fine keepers.

I photographed a waterfall along Fern Creek in Muir Woods, CA, last week.  Let me illustrate how I worked the composition in that case.

The following image is the first image I made when I saw the waterfalls.

Waterfall, Fern Creek, Muir Woods, CA, USA

The first image made of the waterfalls

This first image has a number of branches coming in the way of the view of the falls.  Clearly, I don’t like it and try another shot by moving a bit.  The next image shown here removes a bunch of the blocks and the view is somewhat clear.  However, one fern leaf snuck into the lower end of the image.  It is important to understand that I was viewing through the viewfinder on my f2.8 lens, but I was shooting f22.  This causes this fern leaf to be almost invisible in the viewfinder, due to shallow depth of field, but it shows up in the f22 image.  Plus there is a brown twig in the lower left of the image.  I see all this in my LCD panel and decide to try again.

Waterfall, Fern Creek, Muir Woods, CA, USA

The next image made

I moved and made the following image, in an attempt to remove distracting blocks to the view of the falls.  The following image has problems though.  Some other brown dried leaf has now snuck in, plus the brown twig on the left is still there.

Waterfall, Fern Creek, Muir Woods, CA, USA

The next image made

After some more adjustments to my tripod position, I made the following image.  This composition is almost OK, but, during the 30 second long exposure, I got distracted talking to my kids in the nearby trail and accidentally touched/hit the tripod during the exposure.  Observing the top edge of the rock, just after the falls, I realize that it is not exactly sharp, due to the accidental hit to the tripod during the exposure.

The next image made

I try again, this time getting a sharp image, with minimum distractions.

Waterfall, Fern Creek, Muir Woods, CA, USA

The next image made

Taking one of the final frames during these series, as my base, I decided to use Lightroom to crop it and develop further.  FInally, I removed some branches and twigs to clean it up further.  The final result is as shown below.

Waterfall, Fern Creek, Muir Woods, CA, USA

My final finished image

Many beginners ask me what I mean, when I say “work the composition more”.  I decided to illustrate using this example.

Let me know if you have any feedback on this post.

Surf along Pacific Grove in California

I visited the coast along Pacific Grove one Sunday morning a couple of weeks back.  It was a cloudy day with a slight drizzle.  I wanted to make photographs anyway.  Usually, I look for landscapes with my wide angle lens, composing near-far images.  Unfortunately, I was just beginning to use my Nikon D700, for which the required tripod L-plate was back-ordered.  I was left with only one choice, my 70-200 telephoto (this lens is mounted on the tripod and the camera hangs off of it).  It was an interesting constraint to work with.  After walking around for a while, I figured out a spot from which I could see the surf hitting the rocks along the coast forming interesting patterns as the water washed over the rocks.  I decided to photograph these patterns.  I shot about 200 frames that morning, each one attempting to time the flow of the water just when interesting patterns occurred.  Furthermore, I decided to make long exposures to capture the sense of movement.  To achieve this, I set the ISO to 200 (the native ISO of my Nikon D700), the aperture to f22 (to get the longest shutter speed possible) and let the camera operate in aperture priority mode.  The shutter speeds as determined by my camera ranged from 1/6 s to 1/13 s during my whole shoot.  The 70-200mm f2.8 lens was mounted on my RRS BH-55 Ballhead on my Gitzo 1340 Tripod.  Furthermore, I had my GPS-1A unit on to tag the GPS co-ordinates to my images and I was triggering using a cable release.  Here are a few images from the session, post processed using Lightroom 5 and Google’s Silver Efex Pro 2.

Surf, Pacific Grove, CA, USA

Surf, Pacific Grove, CA, USA

Surf, Pacific Grove, CA, USA

Surf, Pacific Grove, CA, USA

Surf, Pacific Grove, CA, USA

Surf, Pacific Grove, CA, USA

Surf, Pacific Grove, CA, USA

Surf, Pacific Grove, CA, USA

Surf, Pacific Grove, CA, USA

Surf, Pacific Grove, CA, USA


Surf, Pacific Grove, CA, USA

Surf, Pacific Grove, CA, USA


7 Lessons from a Waterfall Image

Fall leaves and small waterfall, Uvas Canyon, Morgan Hill, CA, USA

Fall leaves and small waterfall, Uvas Canyon, Morgan Hill, CA, USA

  1. In overcast conditions, look for colorful subjects (flowers, foliage etc) to make intimate landscapes.  Given the time of the year (mid-Nov), photographing fall leaves was a no-brainer for me.
  2. If possible, emphasize something in the foreground, against the background subject.  In this case, I found this colorful leaf for the foreground to anchor the shot of a background waterfall and more leaves.
  3. Photograph extensive depth images with a wide angle lens.  I used my 17-35mm f2.8.
  4. Use f22, if there is a foreground object very close to the lens, along with background that is far away.  This ensured front to back sharpness due to extensive depth of field.  My lens was about 9 inches away from the foreground leaf.
  5. Use your camera’s native ISO to keep the noise to the minimum.  I used ISO 200, native to my Nikon D300.
  6. Use a tripod.  The shutter speed for this shot was 30 s.  I could not have done it hand-held.  I used my light GK1580TQR5 tripod, coupled with my Kirk BH-1 Ball head.  This tripod is light enough and small enough to actually fit inside my camera backpack.  At the same time, I was not impressed by the ball-head that came standard with this tripod.  I therefore took it out and fitted my Kirk BH-1 ball-head to it.  I now have a fine light tripod, with an extraordinary ball-head.  This tripod provides the stability to shoot long exposures.  This ball-head provides ability to quickly and easily fine-tune my composition, once the tripod is setup.
  7. Do not trigger with your finger.  Use an electronic cable release.  I used one for this shot, to eliminate any camera shake, resulting in a sharp image.

Staged Outdoor Baby Portraits

This post is about photographing babies in a staged outdoor setting.  If you are looking for a procedure to make candid unplanned photographs, please skip this post.  While there are many ways to photograph babies in an outdoor setting, this is my favorite method.

  1. Pick the date of the shoot and figure out the sunset time for that date, using any one of the sunset calendars available online.
  2. Find a good park with good foliage near your home.
  3. On the day of the shoot, in addition to the baby, carry two comforters.
  4. Arrive at the location of the shoot 60-90 minutes before sunset.  The light gets sweeter closer to the sunset.  Light in the middle of the day is not suitable for outdoor portraits.
  5. Setup one comforter for the baby and the other one for the photographer, such that when the photographer is shooting the photographs, the baby is getting side-lighting.  The sun should be on the baby’s left or right, not front/back.  Side-lighting provides a lot of depth to the image.  Front lighting is flat and not recommended, if you can avoid it.  Backlighting, although interesting, is not widely appreciated for outdoor portraits.  Furthermore, set the two comforters such that the background is far away from the baby.  Instead of setting the baby near a background wall or a bunch of background trees, these backgrounds should be far away.  In the park, the photographer should be nearest to the border and the baby should be inside the park, such that the other end of the park is far away.  This will allow you to blur out the background, intensifying the attention of the viewer on the baby.
  6. On the photographer’s comforter, place the tripod, as low to the ground as possible.  This will enable you to shoot from the child’s eye-level.  Do not shoot portraits from up looking down.  It is best to shoot portraits from the eye-level of the subject.
  7. Mount a long lens on the tripod.  My favorite lens is the 70-200mm f2.8 lens.  This lens sits on the tripod.  The camera body hangs on the lens.  A telephoto blurs out the background much more than a normal or wide angle lens.  In addition, a telephoto lens does not have the distortion so common in the wide angle lenses.  Finally, the coverage provided by telephoto lens is most appropriate for portraits.
  8. Mount the camera on it.  I use a Nikon D300.  Mount an external flash on the camera. The on-camera flashes are not good enough.  I use the SB-800 speedlight.
  9. Set the camera to aperture priority exposure mode.  Set the aperture to f2.8 or f4.  This will provide the shallow depth of field to blur out the background.
  10. Choose to shoot with a single focus sensor turned on.  Furthermore, using the jockey at the back of the camera, get comfortable in moving that sensor around as necessary.
  11. Turn on the external speedlight in TTL (BL) mode (Nikon) or eTTL mode (Canon).  This will simply put out some fill light without overwhelming the subject with flash light.  Even if the ambient light is sufficient, this is necessary – it introduces a catch light in the eyes and provides some light to fill the dark shadows.
  12. Place baby on its comforter and let him/her play around.
  13. Start shooting pictures, with the focus sensor on the baby’s eyes.  Even if parts of the baby are not in focus due to shallow depth of field, it is extremely important for the eyes to be tack sharp and in focus.
  14. Keep shooting images, starting from about 30 minutes before sunset, all the way till the last light is all gone.  You should have several hundred frames done.
  15. Go home and pick your best.  Develop the image in Lightroom or similar software.

Thank you for your attention.  If you found this procedure to be useful or even if one aspect of this enhances your technique in any way, please let me know.  Feel free to forward this post to anyone that might benefit from it.

Thank you.

Which DSLR camera should I buy?

This is a very common question from beginners.  To many of them, the answer is not simple due to the large number of options available in the market today.  Let me see if I can simplify and provide a simple path for beginners.

As a photography coach, I have trained hundreds of beginners from all over California and have talked to other photographers from all over the world.  More than 95% of them use either a Nikon or a Canon DSLR.  While any DSLR camera made today is capable of fine images, these two camera makers offer a full suite of lenses and accessory choices.  Is one better than the other?  In my opinion, no.  They are both good, so pick one and stick with it.

You have a few more decisions to make.  Even within the Nikon and Canon camera lines, there are many choices.  How does one boil down to a particular camera body?  This requires understanding of the key differences between the consumer, semi-professional and the professional camera bodies.

Consumer Camera Bodies – These are obviously the entry level bodies that are inexpensive.  For most people, the image quality possible with these cameras are more than sufficient.  I have seen National Geographic Photography competition winning images made with a Nikon D3200.  Consider these, if budget is tight.  The Nikon consumer bodies at the time of this posting are: D3200, D90, D5300 and D7100.  The Canon consumer bodies at the time of this posting are: EOS Rebel T3i, T4i and T5i.  These bodies may be purchased for about $ 1000 or less.

Semi-Professional Bodies – These cost more in the $ 1000 – $ 2000 range.  What is the extra benefit for paying more money here?  Basically, more buttons that perform functions quickly, rather than going into several layers of software menus.  For example, in my Nikon D5100, I have to go into software through several layers of menus to change the ISO for a particular shot.  In my Nikon D300, I am able to make that change using a dedicated ISO button.  It is simply quicker and more efficient to change settings using the semi-professional bodies compared to the consumer bodies.  These bodies also offer a larger number of focus areas for your frame.  For example, my Nikon D5100 offers only nine points on the screen that can be used to focus the scene, while the Nikon D300 offers me 51 focus points.  Can I live with my D5100 and still get the same kind of quality images that I make with my D300?  Absolutely, no question about it.  Is it a little easier to work in the field with a Nikon D300?  Absolutely, without a doubt.  Once I am used to a semi-pro body, I find it hard to operate a consumer body that has most functions hidden several layers within the software menu, interfaced through the LCD screen.  The semi-professional bodies in the Nikon line at the time of this posting are: D300S and D610.  The semi-professional bodies in the Canon line at the time of this posting are: EOS 60D, EOS 60Da and EOS 70D.  If you are serious, consider one of these bodies – you can gradually pick up the use of the buttons and features offered, but beware, once you get used to using one of these bodies, it is pretty hard to go back to a consumer body.  Again, it is the convenience offered by the various buttons and quick adjustments possible that you are paying for.  Not necessarily for image quality.  In addition to these qualities, most of these semi-pro bodies come with an all metal construction that results in rugged reliability in the field.  I am simplifying here, there are a few other marginal benefits to these semi-pro bodies, but don’t want to get too complicated here.

Professional bodies – these are the top of the line bodies that are impervious to dust, rain and snow.  In addition, these bodies come fitted with the highest quality lowest noise sensors and have very high frames per second continuous shooting rates.  These bodies are nicely suited for wildlife, sports and night photography.  For example, my Nikon D300 body can only go up to ISO 6400, but a Nikon D4 can be extended to ISO 204,800.  The professional bodies in the Nikon line are: Nikon D800, D800E, D3x, D4 and Df.  The professional bodies in the Canon line are: EOS 7D, 6D, 5D MIII and IDx.

Full frame sensor vs Crop factor sensor – A full frame sensor has the same size as the 35mm film, which was 36mm x 24mm.  A crop-factor sensor is usually about 24mm x 16mm.  For most beginners, you will not know the difference between these two sensors.  Do not go out and buy a new camera just because you have a crop-factor sensor and the new one is full frame.  The main limitation comes in wide angle landscape photography, wherein, a 17mm lens appears as 28mm or so, given that the sensor is cropping the image projected by the lens onto the backplane.  For beginners, mastering the use of wide angle lenses for landscape photography, takes a while and for the most part, the full frame sensor will not be missed until an advanced skill level is reached.  After practicing for eight years and after using my crop-factor camera, the Nikon D300, for five years, I am finally running into the crop-factor sensor limitations.  In my widest lens, the 17-35mm, I am often shooting landscapes at 17mm and wish I could go wider.  However, in the beginning, it was very difficult for me to compose at 17mm.  I would never reach this lower limit and hence going to a full-frame sensor would not have helped me at all.

My recommended sweet spot camera for beginners: Nikon D7100 or Canon EOS 70D.  Both these cameras have enough controls as dedicated buttons and yet, they may be purchased for around $ 1000.  Once you have used one of these bodies diligently for a few years, you will be able to decide whether to upgrade to a higher level body or not.

CAUTION 1: If you already have a camera body today, please do not go out and buy a new camera based on reading this post.  Just use the camera you already own, to its best.  Then, have a very clear-cut reason to upgrade.  “A new camera is just released.  I simply need to buy it” – does not cut it.  For example, my position is as follows – “I have used my Nikon D300 camera for five years now.  I have made nearly 100,000 images using it.  I continue to use it today, but I am limited.  I love making night photographs in the street, hand-held.  My ISO 6400 is very noisy and many times, it is not sufficient.  I need the high ISO capability of a D4.  Furthermore, as a landscape photographer, I am constantly running into the limit of 17mm on my widest lens and unable to go wider.  I know I can competently use a wider angle than 17mm on my crop-factor lens, and therefore using the same lens on a new D4 with the full frame sensor would do me good.  I am an avid wildlife photographer and could use the higher frames per second offered by the D4.  Plus the D4 has a built-in vertical grip that will be ergonomically better for my shoulder.”  With these reasons, I can justify my next camera purchase, the Nikon D4.  However, I have not pulled the trigger yet, because this camera costs $ 6000.  In digital photography, you have to be careful on how much you spend!

CAUTION 2: Megapixels is not important – this is the first thing people look at when trying to decide on a camera body.  Unless you are a professional fine-art photographer, making poster size prints all the time, megapixels is not important.  99% of the photographers that I have talked to, simply post their images online or enjoy the images on their computer screens.  A majority of them have never printed images beyond 8×10.  At 300 dpi, an 8×10 image would need 2400×3000 pixels, which is 7.2 megapixels.  That is it.  I don’t know of one camera that produces an image less then 7.2 megapixels.  If you are like most people, enjoying your images on your computer screen or posting online, you will not need more than 2 or 3 megapixels.  So, going out of your way to buy a Nikon D800 camera capable of 36 megapixels is sheer waste of money.  The only reason you should consider these high megapixel cameras, is if you are a fine art gallery photographer, making a living by selling 24×36 or larger prints.

I am sure you have come across people, taking for ever to make the jump into DSLR photography, because they are still trying to determine which camera to buy.  If they are beginners and could use some simple direction, please send them a link to this post.

Thank you.