Tag Archives: landscape photography

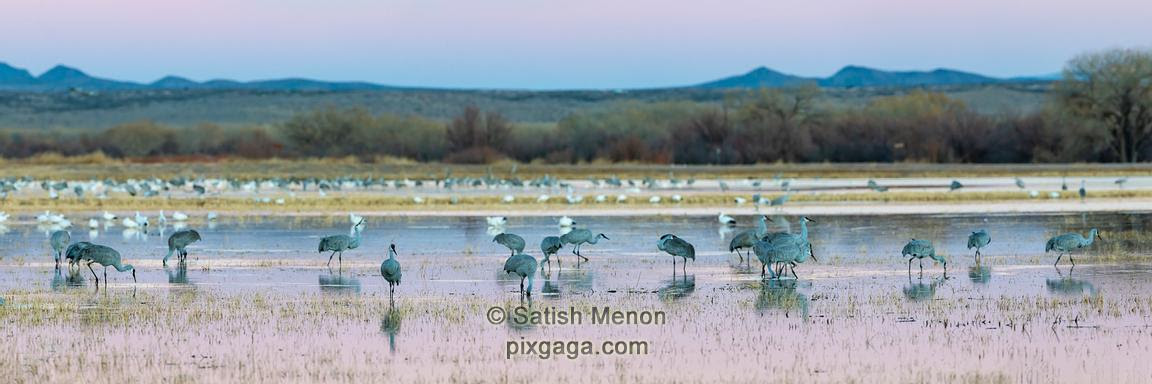
Sandhill Cranes, Bosque Del Apache National Wildlife Refuge

During a recent road trip, I spent a day and a half at the Bosque Del Apache National Wildlife Refuge in New Mexico.  By far, it is one of the best places I have photographed birds.

A day and a half usually means one dawn session, one dusk session and another dawn session the following day.  No photography is done in the middle of the day, between dawn and dusk.

When I visit a place for the first time ever, I rarely make any good photographs.  I am so unfamiliar with the place that most of my mental energy is dissipated in just figuring out the roads or the points to stop at, or simply getting an overview of the place.  Consequently, during my very first dawn session, I made some frames, but no keepers.

In my second visit, the dusk session of day 1, I made this photograph.  I discovered the location from which I could get close to the sandhill cranes.  However, in this session, the whole landscape was more important to me, than the birds themselves,. The post sunset pink in the sky and its reflection in the water, brackets the birds.  Furthermore, the bluish cast of the distant hills nicely complements the bluish gray on the birds themselves.

This is my first ever pano photograph made with my 200-500mm lens at the 500mm end.  Several vertical frames were shot overlapping each other and this panoramic frame was stitched together in Lightroom.  The final file is 85 megapixels, suitable for a large fine art print.

Is this a landscape photograph or wildlife photograph?  Email me at info@pixgaga.com on your thoughts.

Sandhill Cranes, Bosque Del Apache National Wildlife Refuge, New Mexico, USA

Alaska#1

Late July / early August last year, my family and I visited Alaska.  Needless to say, I carried my photography gear and made some good nature photographs, both landscapes and wildlife.  I have edited around 12000 shots to end up with 65 keepers.  I present them to you now, one a day for the next 65 days.  Hope you like them.

Alaska#1 – Glacier, hills and clouds, Prince William Sound, Alaska, USA, photographed late July.  We stayed overnight in Anchorage and drove our rental car to Whittier, Alaska.  From there, we took a day cruise to see glaciers and icebergs.  Loved the views.  In this photograph, you see a glacier ending up into the Prince William Sound bay.  The mountains you see are the glaciated Chugach Mountains.  It was a foggy day and we weathered cold rain and wind.  It was all worth it.  It was hard keeping the front element of the lens from getting wet.  For this photograph, I used my Nikon D700 with the Nikkor 70-200mm f2.8 lens loaded.  This pano shot was made by stitching several individual frames using Lightroom.  During this shoot, I also had my Nikon D4S loaded with my Nikkor 200-500 f5.6 for other moments.  

Prince William Sound, Alaska, USA

View this in the gallery and order a print – Link.

Register for my next webinar or ask a question for potential inclusion in my upcoming ebook, “101 tips for Digital Travel Photography” – Link.

It takes three visits …

When a new place is to be photographed, doing a great job on the first and only visit to the place is indeed rare.  I know this from first hand experience.  Whenever I visit a new place, I rarely succeed making a great image on the first day.  Usually, the first day is spent in just acclimatizing myself to the new location and developing a broad idea of the possibilities of the place.  On the second and third days that I am in the new location, I start to make images.  When I visited Yellowstone for the first time, I made good images on the second and third days, not the first day that I got there.  When I photograph locally around my house, a bulk of my landscape photographs are made over the weekend and typically one day of the weekend (such as a Saturday or a Sunday).  Therefore, my best local landscapes are made when I revisit the same location three consecutive weekends.

Earlier this month, I photographed the Big Basin Redwoods State Park, which is located about 90 minutes from my home in San Jose, CA.  On my first visit to this place, I hiked with a friend and my son for several hours and had no images taken.  On our return, just by luck, I found a tree and the surrounding forest interesting and made a vertical panoramic stitch.  I would have been perfectly happy not making a single image in that visit, but I took advantage of the opportunity and made this image.

Big Basin Redwoods State Park, Boulder Creek, CA, USA

Big Basin Redwoods State Park, Boulder Creek, CA, USA.  Image made on first visit to location.  Usually, I am happy making no images on the first visit.

This image was made by shooting several vertically overlapping images that were stitched together in Photoshop.  Not a bad image for my first trip, but most people expect a lot of images from just one trip.

Now, on the way back from this first trip, I observed that the morning fog had settled on part of the road and furthermore, since the sun had risen quite a bit by our return, we also witnessed godbeams in several parts of the road.  However, due to earlier commitments, we could not stop to photograph.  I made a mental note of the location on the road and the time we saw that light, promising to come again soon.

The next day, I made my second visit to the same location, timing myself based on the previous days’ observation.  Lo and behold, the same light appeared on several sections of the road and I was able to make several images with greater ease and higher success.  Here are a few of them.

Early morning fog along road, Big Basin Redwoods State Park, Boulder Creek, CA, USA

Early morning fog along road, Big Basin Redwoods State Park, Boulder Creek, CA, USA.  Image made on my second visit to this location.

Trees and Morning Fog, Big Basin Redwoods State Park, Boulder Creek, CA, USA

Trees and Morning Fog, Big Basin Redwoods State Park, Boulder Creek, CA, USA.  Image made on second visit to this location.

Crepuscular rays, Big Basin Redwoods State Park, Boulder Creek, CA, USA

Crepuscular rays, Big Basin Redwoods State Park, Boulder Creek, CA, USA.  Image made on my second visit to this location.

These are just some of the images made during my second visit.  It was much more successful than my first trip.

Interesting thing is that I noticed a great vista point in the location that had bad light when I was returning from both my first and second visits.  To photograph from that vista point, I decided to make a third trip.

The following are couple of images I shot from the vista point, on my third visit.

Foggy morning, Big Basin Redwoods State Park, Boulder Creek, CA, USA

Foggy morning, Big Basin Redwoods State Park, Boulder Creek, CA, USA.  Image made on my third visit to this location.

Foggy morning, Big Basin Redwoods State Park, Boulder Creek, CA, USA

Foggy morning, Big Basin Redwoods State Park, Boulder Creek, CA, USA.  My last keeper image from my third visit.  My most favorite image from the three visits.

My last keeper image in this series also happens to be my favorite image from the series.  To reach this image, I had to make three visits.

In general, if you are looking to photograph a new landscape location, give it at least three visits.

Several things happen as you advance from the first to the third visit:

  1. You get very familiar with the roads and the access to key locations
  2. You get very familiar with the photogenic possibilities of the location
  3. You get very familiar with how and when the light is going to start and advance
  4. You get time in between the visits to pre-visualize a composition

In summary, allow time for the new location to grow on you.  Give it at least three visits.

If you like this post, please forward it to your friends.   Furthermore, I would greatly appreciate it if you could visit my Facebook page, https://Facebook.com/pixgaga and “like” it.  Comments on this post most welcome.


7 Lessons from a Waterfall Image

Fall leaves and small waterfall, Uvas Canyon, Morgan Hill, CA, USA

Fall leaves and small waterfall, Uvas Canyon, Morgan Hill, CA, USA

  1. In overcast conditions, look for colorful subjects (flowers, foliage etc) to make intimate landscapes.  Given the time of the year (mid-Nov), photographing fall leaves was a no-brainer for me.
  2. If possible, emphasize something in the foreground, against the background subject.  In this case, I found this colorful leaf for the foreground to anchor the shot of a background waterfall and more leaves.
  3. Photograph extensive depth images with a wide angle lens.  I used my 17-35mm f2.8.
  4. Use f22, if there is a foreground object very close to the lens, along with background that is far away.  This ensured front to back sharpness due to extensive depth of field.  My lens was about 9 inches away from the foreground leaf.
  5. Use your camera’s native ISO to keep the noise to the minimum.  I used ISO 200, native to my Nikon D300.
  6. Use a tripod.  The shutter speed for this shot was 30 s.  I could not have done it hand-held.  I used my light GK1580TQR5 tripod, coupled with my Kirk BH-1 Ball head.  This tripod is light enough and small enough to actually fit inside my camera backpack.  At the same time, I was not impressed by the ball-head that came standard with this tripod.  I therefore took it out and fitted my Kirk BH-1 ball-head to it.  I now have a fine light tripod, with an extraordinary ball-head.  This tripod provides the stability to shoot long exposures.  This ball-head provides ability to quickly and easily fine-tune my composition, once the tripod is setup.
  7. Do not trigger with your finger.  Use an electronic cable release.  I used one for this shot, to eliminate any camera shake, resulting in a sharp image.

When many things come together …

Grand Canyon Dawn in Winter

Grand Canyon Dawn in Winter

Many things came together that resulted in this image.

  1. Good light.  I almost thought that I would not get good light that morning.  It was dark, cold and cloudy.  However, the clouds just opened up and brought in some great light, just after sunrise.
  2. I found this rock as a foreground to lead the viewers into the image.
  3. There is tremendous depth.  You can examine the details from the foreground to the background and there is enough to see at every stage of your journey.