Author Archives: Satish Menon

Alaska#5

Iceberg, Prince William Sound, Alaska.  This was the first time ever that I witnessed an iceberg.  Needless to say, my Nikon D4S with the Nikkor 200-500mm f5.6 lens was smoking from all the work it got.  For a native Alaskan, this may not be a novel sight.  For me, it was.

Iceberg, Prince William Sound, Alaska, USA

Buy a print – Link

Register for my next webinar or ask a question for potential inclusion in my upcoming ebook, “101 tips for Digital Travel Photography” – Link

Alaska#4

Glaciated Chugach Mountains and clouds, as seen from Prince William Sound, Alaska.  Several individual frames stitched together in Lightroom to create this pano shot.  Nikon D700 with Nikkor 70-200mm f2.8 lens.

Prince William Sound, Alaska, USA

Buy a print – Link

Register for my next webinar or ask a question for potential inclusion in my upcoming ebook, “101 tips for Digital Travel Photography” – Link

Alaska#3

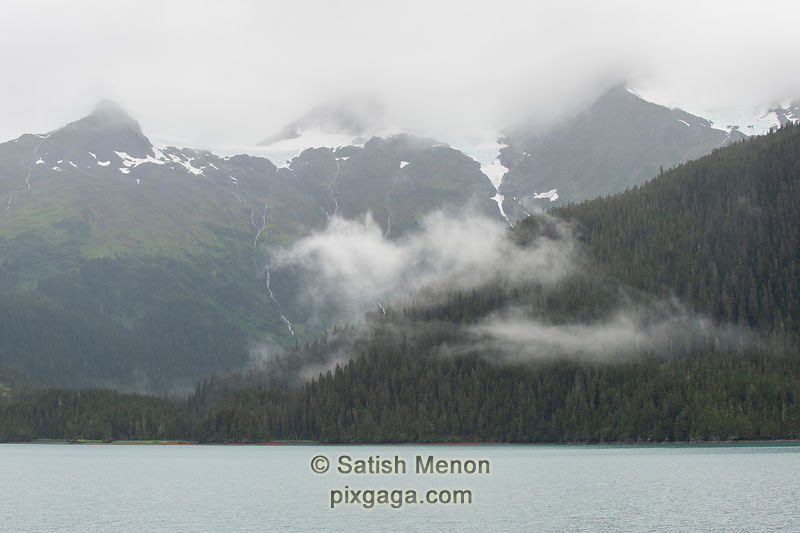
In this shot of the Chugach Mountains shot from Prince William Sound of Alaska, you see a Glacier at the very top with some flow into this bay.  I love how the mountain edges, the glacier, the tiny flows into the bay and clouds all provide a sense of balance in the elements.  This photograph does not do justice to the scale of things I saw that day, but I am trying.  Nikon D700 with Nikkor 70-200mm f2.8 lens.

Prince William Sound, Alaska, USA

Buy a print – Link

Register for my next webinar or ask a question for potential inclusion in my upcoming ebook, “101 tips for Digital Travel Photography” – Link

Alaska#2

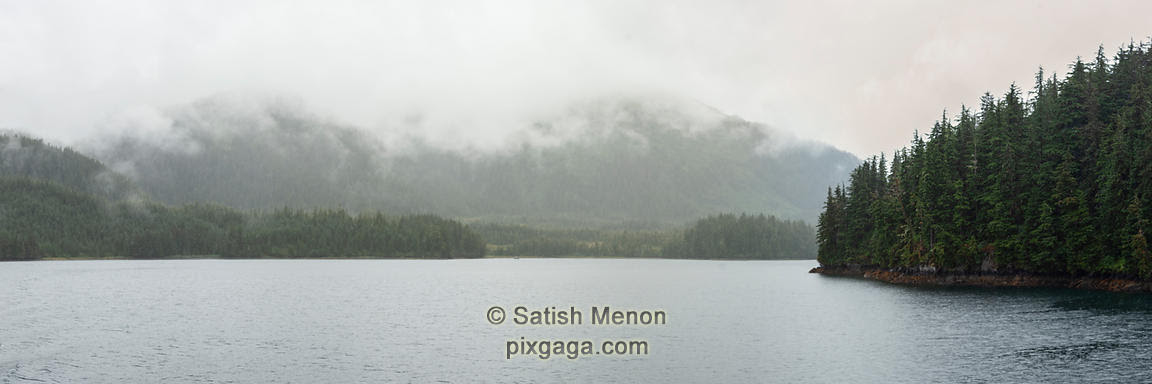
This is another shot of Prince William Sound in Alaska.  I like how the clouds settled over the Chugach Mountains.  The conditions were the same as yesterday’s photograph.  This pano shot was also made by stitching several individual frames using Lightroom.  Nikon D700 with Nikkor 70-200mm f2.8 lens.

Image of Prince William Sound, Alaska, USA
Prince William Sound, Alaska, USA

Buy a print – Link

Register for my next webinar or ask a question for potential inclusion in my upcoming ebook, “101 tips for Digital Travel Photography” – Link

Alaska#1

Late July / early August last year, my family and I visited Alaska.  Needless to say, I carried my photography gear and made some good nature photographs, both landscapes and wildlife.  I have edited around 12000 shots to end up with 65 keepers.  I present them to you now, one a day for the next 65 days.  Hope you like them.

Alaska#1 – Glacier, hills and clouds, Prince William Sound, Alaska, USA, photographed late July.  We stayed overnight in Anchorage and drove our rental car to Whittier, Alaska.  From there, we took a day cruise to see glaciers and icebergs.  Loved the views.  In this photograph, you see a glacier ending up into the Prince William Sound bay.  The mountains you see are the glaciated Chugach Mountains.  It was a foggy day and we weathered cold rain and wind.  It was all worth it.  It was hard keeping the front element of the lens from getting wet.  For this photograph, I used my Nikon D700 with the Nikkor 70-200mm f2.8 lens loaded.  This pano shot was made by stitching several individual frames using Lightroom.  During this shoot, I also had my Nikon D4S loaded with my Nikkor 200-500 f5.6 for other moments.  

Prince William Sound, Alaska, USA

View this in the gallery and order a print – Link.

Register for my next webinar or ask a question for potential inclusion in my upcoming ebook, “101 tips for Digital Travel Photography” – Link.

Discovering my vision at Rainbow Falls, CA

I went to Rainbow Falls in California’s Eastern Sierra over the July 4th weekend.  My first visit to the falls was in the middle of the day, with my family.  Since the sun was shining into the falls at that time of the day, it formed a rainbow at the base of the falls upon which it is named.  From a photographer’s perspective, the light was too harsh and no good waterfall image could be produced at that time.

I came back the next day, early enough before sunrise, to get the light right for a waterfall image.  While the grand view from the standard vista point was great, it did not offer anything satisfying for me.  For example, one search for Rainbow Falls, CA in images.google.com, yields several images of the standard view.  I began by making a standard view image as well.  Here it is.  It does not impress me and therefore it has not been published in my web gallery.

Rainbow Falls, CA

Rainbow Falls, CA. (Standard View from Vista Point)

After getting the standard shot out of the way, I started exercising my visual imagination to make additional more satisfying images.  Using my 70-200mm f2.8 lens at 200mm, I made a frame that was later cropped to this 1:3 format.  This is a section of the waterfall towards the right side of the view from the vista point.  To me, this image is a compelling composition.  It has a series of waters falling from the top right into the bottom one-thirds of the image, where there is a diagonal flow of water from the left to the right.  There are distinct shapes and flows in the top, middle and bottom one-thirds of the image that grabs attention.

Rainbow Falls (section), CA, USA

Rainbow Falls (section), CA, USA

Another shot using my 70-200mm f2.8 lens with 2x teleconverter (set at effective 400mm), is shown below.

Rainbow Falls (section), CA, USA

Rainbow Falls (section), CA, USA

This one shows a single strand of waterfall to the right of the image counter-balancing the diagonal cascade going left to right.

Another 400mm shot is shown below.

Rainbow Falls (section), CA, USA

This one emphasizes the wall of water towards the right of the view from the vista point.  The wall of water and its shapes/texture is counter balanced by the rocks at the bottom right.

As I wrapped up my shoot, I used the same 400mm setup to frame a couple of shots of the runoff from the falls.

Runoff from Rainbow Falls, CA.

Runoff from Rainbow Falls, CA.

This one showcases the whites from the falls runoff counterbalanced by the green grass on the shore.  I saw this first and upon closer examination, I found a dead fallen tree bark whose branches pointed towards these whites.  I thought that they formed a perfect set of complementary subjects to juxtapose in an image.  Here it is.

Dead tree bark and whites from Rainbow Falls runoff, CA, USA

Dead tree bark and whites from Rainbow Falls runoff, CA, USA

Notice how the shapes in the branches of the dead tree bark, mirrors the shapes of the whites (the branches pointing one way and the whites following it).

Using this post, I want to encourage more photographers to look beyond the obvious.  The first thing that you see when you get to location should be photographed, but one should not stop there.  The better photographs come from staying there, a bit longer, and looking for what else is there, or, how else the scene may be photographed.  Changing viewpoints and changing lenses are the simple exercises to get you started on the road to eventually change what you see and see more.

Correcting White Balance in Digital Images using expodisc 2.0

Of all the autoexposure features available in modern DSLRs, the one that is most frustrating for me is the Auto-WB.  For years, I set the white balance to Auto-WB, hoping to be fine with the color in my digital images.  Again, for all those years, my mind wasn’t tuned to deciphering the color issues.  Recently, I noticed that some of my landscape shots looked too blue to me.  Talking to a former photography student and now a good photographer himself, Sanjiv Kapoor, I learned how to adjust the color temperature and the tint sliders in Lightroom to get the right colors.  Furthermore, I learned the idea of using a WB filter to reduce the guesswork involved in this exercise.  Here’s how.

This is my process for RAW shooting.  I attach an expodisc 2.0 WB filter to the front of the lens, in the light condition of the main shot, to make a reference image at metered exposure.  It produces a perfect (18%) neutral gray image.

Neutral Gray Image

Neutral Gray Image made with a WB filter in the same light as the image subject.  Caveat – if you are viewing this post in a monitor not correctly color calibrated, you are not seeing neutral gray.

Once opened in Lightroom, the default may not open up as neutral gray.  It will open up with a default color temperature and tint, that may not be the real color temperature/tint.  Drop the eyedropper from the Lightroom Develop Module into this image.  That neutralizes any color cast in this reference and gives you the right white balance.  Just apply the same color temperature and tint to the desired image.  It is quite easy to do this in Lightroom, by simply “sync”ing the develop settings.  In fact, I spend my time long enough on this reference (see the dust spot in it – I correct that, plus apply the lens profile etc), before “syncing” it to all the frames shot in the same light.

Here’s an example.  As opened in Lightroom, the top image shown here is how it looked.

Image as seen after Lightroom opened RAW file

How this image looked when RAW file was opened up as default in Lightroom. Too blue and not representing what was seen.

This is too blue and did not represent what was seen.  The color temperature was 5750 with a tint of -4.  The neutral gray reference shot shown earlier had a color temperature of 8800 with a tint of -5.  Upon correcting this image to that, the resulting final image is shown below.

Image with corrected white balance

Image with corrected white balance, with the aid of the expodisc 2.0

This represents what was seen.

Now that I have figured this out, and now that I have tuned my mind to seeing colors a bit better, I find all kinds of color errors all over my portfolio from years of work!!  🙂  As I find time, I will keep correcting the color of my past photographs, but I don’t have the reference shots to help me.

NOTE: The user’s manual for expodisc 2.0 talks about a different way to use it.  Take a reference shot into the camera, by using a setting for white balance reference shot.  Then the following images will be rendered correctly.  In my honest opinion, this method is appropriate for jpg shooters.  The method I outlined here is more suited for RAW shooters.

Expressing my own photographic vision in Yosemite

THE CONTEXT

I went to Yosemite on Feb 18.  As I was driving through the valley, enjoying the scenery and making my images, I noticed a group of about 50+ serious photographers all bunched up at one spot along the South Drive in Yosemite Valley.  They were all standing beside their tripods, with their 70-200mm lenses pointing in about the same direction.  I was curious and couldn’t wait to find out what they were up to.  I stopped my car, walked up to this group and inquired what was going on.  One of them shared with me that the horsetail falls would light up in the last light of the setting sun and that they were all waiting for that magical moment to be photographed.  I immediately recalled my reading of Galen Rowell’s book, “Mountain Light”.  Galen had photographed this phenomenon and had also provided insight into the precise time of the year when this magical phenomenon would occur.  It did not happen all the time, because of the changes in sun’s trajectory relative to the location of the falls.  A special time of the year indeed.

WHAT OTHERS PHOTOGRAPHED THAT DAY

At the time of this writing, I just searched Google Images for “glowing horsetail falls yosemite” and just saw several hundred images, all looking about the same.  There are just a handful of them that are unique.  For example, see this great image, made coincidentally on Feb 18, by Michael Frye – http://www.michaelfrye.com/landscape-photography-blog/2016/02/19/horsetail-el-capitan/.

MY REACTION

After settling my curiosity on what was going on, my instinct was to move on and continue to find my own images.  Being a passionate photographer myself, I did not feel like joining them to wait for that magical moment.  My heart was not there.  Joining this crowd to repeat what they were doing, to make an image just like theirs, would not give me any joy and I did not want to have anything to do with it.

MY VISION

I find satisfaction from my photography, only if the photograph represents something I found.  I do not consciously copy what others do and I get no joy from doing so.  Since all of my photography knowledge and skill is based on studying the works of great photographers that have walked before me, no doubt, there is a subconscious influence from them.  My composition style is certainly subconsciously influenced by all the great photographs that I have seen in the books that I have read.  In that sense, I am not original.  At the same time, I do not study a famous photograph of Yosemite tunnel view or Half Dome and go there to duplicate it.  If I had joined that group of 50+ photographers that day, I may have walked away with a stellar photograph of a great phenomenon, but it would not represent my vision and would therefore give me no joy.  I have seen many photographers, many of them in my own photography workshops, who go to a location and do the following.  They set up their tripods, and then look up other famous images of that location on their iphones and try to recreate it.  Being there in excellent light was by itself not sufficient.  They need this iphone review of past great images, to inspire them.  I am exactly the opposite.  When I visit a new location, my research through TripAdvisor, Google, Wikipedia and other sources, is restricted to figure out where to go, but never to study previously photographed images of that location.  I go there, soak it in and let the place talk to me.  Once a particular scene touches my visual heart, I pull out the camera and work on dissolving myself (get lost) into the scene.  I capture some compositions and keep fine tuning until I feel that my vision is exhausted.  In fact, if there is another photographer in the vicinity, I usually walk away until I find some solitude to work my vision unhindered.

That day, when the group I ran into, were set up to capture the glowing horsetail falls, I simply moved on and made my own images.  Here are my 7 keepers from my day trip to Yosemite on Feb 18.  None of them may be as stellar as Michael’s horsetail falls shot, but these are images dear to me as it represents my original vision.  I made them alone and haven’t seen another photographer’s work look similar to these.  These are mine and therefore extremely fulfilling for me.

  1. El Capitan and Afternoon Clouds

    El Capitan and Afternoon Clouds, Yosemite, CA.

    El Capitan and Afternoon Clouds, Yosemite, CA.

    Usually, I refrain from making landscape images in the afternoon.  Most of the time, I shoot early at sunrise or late at sunset.  However, the afternoon clouds offered an incredible sight on Feb 18.  The uninteresting afternoon light prompted me to give it a black and white treatment.

  2. Runoff stream from Bridalveil Falls, Yosemite, CA

    Runoff from BridalVeil Falls, Yosemite, CA

    Runoff from BridalVeil Falls, Yosemite, CA

    While the BridalVeil Falls by itself forms interesting viewing, it did not offer anything photogenic for my eyes.  I ended up spotting this area of its runoff.  In fact, I made over ten different compositions at this spot and finally picked this as my keeper.  The black and white treatment emphasizes the colorless winter look.

  3. Trees and Reflection, Yosemite, CA

    Trees and Reflection, Yosemite, CA

    Trees and Reflection, Yosemite, CA

    Whenever, I see water bodies, I look for compositions similar to this one.  The emphasis is on the reflection in the water, while the trees above water provides the context.  The strong dark tree trunks in the left (along with its reflection) anchors an otherwise floating green scene.

  4. Trees and Reflection, Yosemite, CA

    Trees and Reflection, Yosemite, CA

    Trees and Reflection, Yosemite, CA

    This is another interpretation of the scene depicted in image 3 above.  I couldn’t resist the lure of the panoramic.  There is something very attractive about the 1:3 format for me.  A series of floating dark tree trunks are anchored by the strong pair of dark tree trunks on the right of the image.  Several individual frames were stitched to create this one.  Viewing this in a larger size on a large monitor brings out its glory better.  Try viewing this same image on a large monitor from my website gallery in the panoramic section.

  5. Vertical Face of El Capitan, Yosemite, CA

    Vertical face of El Capitan, Yosemite, CA

    Vertical face of El Capitan, Yosemite, CA

    Later in the afternoon, the clouds continued to mesmerize.  This time, I witnessed how the vertical face of El Capitan and its magnificient size could be emphasized by showing how it rises into the clouds.  Again, couldn’t resist the lure of the 1:3 format, but in the lesser used vertical form.  I stitched several frames vertically to create this.  The vertical pano format also emphasizes the height of this famous rock.  The uninteresting afternoon light called for black and white treatment.

  6. Trees and reflection, Yosemite, CA

    Trees and Reflection, Yosemite, CA

    Trees and Reflection, Yosemite, CA

    Here is another location that offered an excellent photo opportunity with mirror reflection of interesting trees with dark trunks.  I shot this originally in the native format of 2:3, but cropped a little to emphasize the reflection.  Again, this image has a greater impact when viewed in larger size.  View this in the Landscapes (color) section of my website gallery.

  7. Trees and reflection, Yosemite, CA

    Trees and Reflection, Yosemite, CA

    Trees and Reflection, Yosemite, CA

    This is another interpretation of the same scene shown in image 6.  Again, I couldn’t resist the lure of the 1:3 panoramic format.  It is debatable which of image 6 and 7 is better.  I like both of them because I made them – my wife and kids love image 6 better.  This image is also better enjoyed as viewed larger from the panoramic section of my website gallery.

Walking away with 7 landscape keepers from one day’s shoot is unusual for me.  I usually find one keeper out of a day’s worth of effort.  Some of these images will eventually be deleted.  I think two of them may survive over time.  Since these are my new babies, I like all of them for now.

CONCLUSION

My point of this blog is not to belittle those that wanted to create the magic originally seen in Galen’s image of horsetail falls.  In fact, I am not sure if Galen was the first one to do it, but certainly his image is the earliest I have seen.  Also, Michael Frye’s image points out how one can be original even today, with the same old location.  My point, however, is that I see far too many photographers attending my workshops who are very happy simply recreating other images they have seen.  In fact, they keep visiting the same iconic locations that have been over-photographed.  Through this post, I want to encourage at least some of you serious photographers to go out and open up to find your own images.

Red Streak Noise in Long Exposure Night Shots Solved

Last Saturday, I was photographing along the California Hwy 1 coastline at night.  It was pretty dark requiring long exposures.  With that came a noise problem – a red streak in the image.  See below.

Long Exposure Night Shot of Sea Stack showing red streak noise

Long Exposure Night Shot of Sea Stack along California Hwy 1 Coast. See the two red streaks in the lower one-thirds of the image.

This was an eight minute exposure.  Shot at f22, ISO100.  Nikkor 70-200mm f2.8 lens and Nikon D4S body.  Fortunately, I had another two minute exposure of the same composition, made when there was a bit more light that would work for me as a keeper.  So, I had not lost the shot.  But, it was disconcerting to realize that I was limited to two minute exposures with this lens for night shots.

First, I wanted to ascertain that the red streak noise was repeatable.  I ran a series of tests on long night exposures yesterday, only to realize that with this lens, it was very repeatable as long as the scene was pretty dark and my exposure was greater than 2 minutes @ ISO100.  I also verified other ISOs and found that the red streak noise found during 4 minutes @ ISO100 and that found during 1 minute @ ISO400 were about the same.  There was no escaping this.  If I needed to shoot in very dark conditions – I will not be able to get away with shorter exposures, using ISO to compensate.  This was depressing …

Next, I attempted to see if “long exposure noise reduction” would compensate for this issue.  After all, the long exposure noise reduction works by making a dark exposure with identical parameters, with the shutter closed.  The idea is that the noise on the sensor would be same, which is later subtracted from the main image, thus reducing or eliminating to a great extent the noise resulting from long exposure.  The results of these tests were disappointing as well.  The noise was the same in the RAW files, but slightly reduced in the in-camera JPGs.  I shoot 100% RAW and would not be happy switching to JPG for the slight reduction in the red streak noise.  I needed to solve it fully.

As I drove around and lived my life today, it occurred to me that I should perhaps try to apply the long exposure noise reduction idea manually.  At the next opportunity I got, I put the lens cap on the same lens and made an eight minute exposure at f22 and ISO100.  The resulting dark exposure with red streak noise is shown below.

Dark exposure with lens cap on, recreating the red streak noise alone.

Dark exposure with lens cap on, recreating the red streak noise alone.

Now, I had to figure out a way to subtract the red streak noise seen in this image, from the original image.  Since I have been stacking images in Photoshop for years, this was easy for me to figure out.  Here is the procedure:

1. Load both images from LR into PS as layers.

2. Right-click the layers in PS and “Convert to Smart Object”.

3. Pull-down “Layer” > “Smart Objects” > “Stack Mode” > Range.

Stacking using “Range” makes sense, because it is essentially subtracting the maximum signal from the minimum signal and providing the difference.  Since the second image (containing only the red streak noise) has black in the rest of the image, only the red streak noise will get eliminated.

I tried this procedure and “bingo”, it worked.  The red streak noise was eliminated and there was no loss to the image quality.  All details of the underlying image came alive just as I had imagined.  The resulting red streak noise free image is shown below.

Red streak noise has now been eliminated in this image, using the procedure mentioned in this post.

Red streak noise has now been eliminated in this image, using the procedure mentioned in this post.

Conclusion – While I have not solved how to prevent the red streak noise in the first place, I have a pretty good procedure to deal with it in post.  Just take another image with the same exposure parameters as the real image, with the lens cap “on” this time.  This may be done several days later and in conditions different from the shoot.  Then, subtract the latter from the former using the PS procedure just outlined.

PS.  I have observed this red streak noise in my Nikkor 70-200mm f2.8 VR lens.  Others have reported it on the Nikkor 16-35mm f4 lens.  I checked my 16-35mm f4 lens and do not see this noise in that one.

If you have seen this type of red streak noise during long night exposures, please try this procedure and let me know if it worked for you.  I would appreciate it, if you could post your success story as a comment here.  Thank you for your attention.

On Renting Super Telephoto Lenses

I get this question often and thought I should write a brief post about it.

There are some lenses that are extremely expensive for most photography enthusiasts to afford and hence they are very interested in renting these.  Especially for a big safari trip to Africa.  For example, the 500mm and 600mm prime lenses used for wildlife and sports photography.  The main misunderstanding among those considering a super telephoto lens rental is the feeling that the only gap between them and great wildlife/sports photographs, is the lens.  This is plain wrong.

Simply having a great lens is not sufficient for you to make great images with it.  What you really need is lots of practice with that lens for a prolonged time, until you are familiar with using it proficiently.  Exposure and focusing problems aside, one of the hardest skills to master in wildlife or sports photography is the ability to track a fast moving bird or object.  In the beginning stages, even with my 70-200mm f2.8 lens coupled with a 2x teleconverter, it was a real achievement for me, if I could spot a flying bird with my eyes and then immediately point my lens towards that bird and barely be able to see that bird through the viewfinder.  Even getting this far was difficult, let alone getting the bird in focus and furthermore, ensuring that the eyes of the bird were sharply focused with a glint in it.  Look, handling super telephoto lenses in the field successfully, requires loads of years of practice and renting them for a first and last Kenya trip does not make sense.  You will spend more time fumbling with your equipment than enjoying your visit.

So what to do – Buy yourself some inexpensive wildlife lenses and practice with it locally for months and months before you go.  For example, the 70-200mm f2.8 lens with a 2x teleconverter is what I use.  You can go for something similar.  I recently heard that 3rd party lens manufacturers have a very affordable 100-300 mm f4 lens that can be coupled with a 1.4x teleconverter to give you a 140-400mm range.  If you do this with a crop-factor sensor, you effectively have a 600mm reach.  Now, if you can really afford to buy a 600mm lens for the $10,000 price tag, go for it.  But, please don’t buy it one week before your once-in-a-lifetime Tanzania trip.  Buy it a year before and practice in your local park, until you get good at it, before you go.

So when to rent – Despite what I have said so far, there are situations in which renting makes sense.  Here are some examples –

  1. You already have a 600mm lens and for some reason, it broke just one week before your big Safari trip.  Go ahead and rent the same one.
  2. You don’t want to risk carrying your big lens on an airline with all the restrictive carry-on luggage limits.  Leave your lens at home and rent one at the Safari location, if available.
  3. You usually use a 17-55mm f3.5-5.6 lens and based on the dark situations involved in your next night photography trip, you feel the need for a faster lens.  Go ahead and rent the 17-35mm f2.8 lens.
  4. You already have a 600mm lens, but your manufacturer has introduced a newer version with additional features.  You want to test whether the new features are worth it for you.  Go ahead and rent the newer version lens and try it out for a couple of weeks, before you decide to upgrade yourself.

You get the idea.  Don’t rent a lens in a focal length range that you have never photographed just for that once-in-a-lifetime trip.  It simply won’t work.

If you like this post, please forward to your friends.  My facebook page is https://facebook.com/pixgaga.  If you like, please sign up for my “photography tips” emails delivered to your email box.

American Avocet in flight, Don Edwards Wildlife Refuge, Alviso, CA, USA

American Avocet in flight, Don Edwards Wildlife Refuge, Alviso, CA, USA. I made this image a few months back. And, I have been practicing photography for nine years. It took me that long to succeed in a well timed shot like this. I could not have done it with a rented super telephoto lens.

Turkey Vulture, Alviso, CA, USA

Turkey Vulture, Alviso, CA, USA. One of the most difficult things in wildlife photography with telephoto lenses, is to be able to frame a fast moving bird or animal well.  Years of practice is required.